
wah...kebetulan nih...ada temen lagi ngerjain Tugas akhir yang displaynya pake LCD graphic nokia type 3310, bisa nebeng beli satu ni...buat belajar...hhee.hhee..HHm..kalau dipikir-pikir LCD graphic nokia 3310 ini memiliki beberapa keunggulan dibandingkan dengan LCD display biasanya (yang 16x2)..
1. lebih kecil dan ringan
2. 84x48 pixels (14 kolom dan 6 baris)
3. harganya jauh lebih murah (cuma Rp. 25.000,00)
4. tegangan supplynya 3.3 volt
5. bisa menampilkan gambar bitmap
wah..pokoke muanteep deh... (orang ndeso..) :-p
* Pin 1 -> +3.3V
* Pin 2 -> Arduino digital pin 3
* Pin 3 -> Arduino digital pin 4
* Pin 4 -> Arduino digital pin 5
* Pin 5 -> Arduino digital pin 7
* Pin 6 -> Ground
* Pin 7 -> (+) 10uF capacitor (-) -> Ground
* Pin 8 -> Arduino digital pin 6
Rangkaiannya kalau tidak pakai arduino board, tapi pakai atmega8
cuma beda di sumber saja kalau ini harus pakai dioda zener 3v3
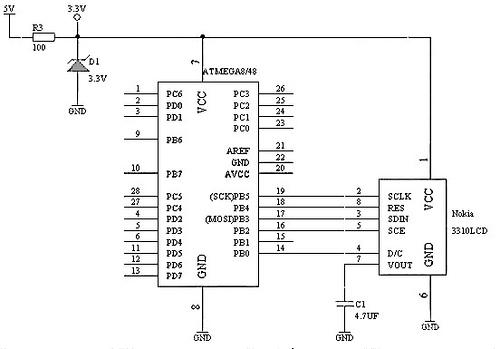
konfigurasi pin LCDnya...

download librarynya disini


:: Program menampilkan text ::
#include <PCD8544.h>
static PCD8544 lcd;

void setup() {
  lcd.begin(84, 48,CHIP_ST7576);
}

void loop() {
  lcd.setCursor(0, 0);
  lcd.print("test lcd nokia");
  lcd.setCursor(0, 1);
  lcd.print("type : 3310");
  lcd.setCursor(0, 2);
  lcd.print("gunture");
  lcd.setCursor(0, 3);
  lcd.print("dot");
  lcd.setCursor(0, 4);
  lcd.print("blogspot");
  lcd.setCursor(0, 5);
  lcd.print("dot com");
}

:: Program membuat karakter ::
#include <PCD8544.h>
// A custom glyph (a smiley)
static const byte glyph[] = {
B00010000,
B00110100,
B00110000,
B00110100,
B00010000
};

static PCD8544 lcd;

void setup() {
// PCD8544-compatible displays may have a different resolution
  lcd.begin(84, 48, CHIP_ST7576);
// Add the smiley to position "0" of the ASCII table
  lcd.createChar(0, glyph);
}
void loop() {
// Write a piece of text on the first coloms and third line
  lcd.setCursor(0, 2);
// write the smiley
  lcd.write(0);
}
Yang paling saya suka dari lcd graphic ini yaitu lcd ini bisa dimasukkan gambar bitmap dari paint (tapi hitam putih) tentunya setelah gambar tersebut kita convert menjadi code program...
1. Buatlah sebuah gambar di ms.paint, dengan resolusi 84x48 pixels, black and white
(dalam blog ini saya membuat gambar mobil ambulance)


:: Program menampilkan gambar bitmap::
#include <PCD8544.h>

// A bitmap graphic (84x48) of an ambulance car...
static const byte ambulance[] = {
0x00, 0x00, 0x00, 0x00, 0x00, 0x00, 0x00, 0x00, 0x00, 0x00,
0x00, 0x00, 0x00, 0x00, 0x00, 0x00,
0x00, 0x00, 0x00, 0x00, 0x00, 0x00, 0x00, 0x00, 0x00, 0x00,
0x00, 0x00, 0x00, 0x00, 0x00, 0x00,
0x00, 0xE0, 0xE0, 0xE0, 0xE0, 0x00, 0x00, 0x00, 0x00, 0x00,
0x00, 0x00, 0x00, 0x00, 0x00, 0x00,
0x00, 0x00, 0x00, 0x00, 0x00, 0x00, 0x00, 0x00, 0x00, 0x00,
0x00, 0x00, 0x00, 0x00, 0x00, 0x00,
0x00, 0x00, 0x00, 0x00, 0x00, 0x00, 0x00, 0x00, 0x00, 0x00,
0x00, 0x00, 0x00, 0x00, 0x00, 0x00,
0x00, 0x00, 0x00, 0x00, 0x00, 0x00, 0x00, 0x00, 0x00, 0x00,
0x00, 0x00, 0x00, 0x00, 0x00, 0x00,
0x00, 0x00, 0x00, 0x00, 0x00, 0x00, 0x00, 0x00, 0x80, 0x80,
0x80, 0x80, 0x80, 0x80, 0x80, 0x80,
0x00, 0xFC, 0xFC, 0xFC, 0xFC, 0xFD, 0xFD, 0xFD, 0xFD, 0xFC,
0xFC, 0xFC, 0xFC, 0xFC, 0x0C, 0x0C,
0x0C, 0x0C, 0x0C, 0x0C, 0x0C, 0x0C, 0x0C, 0xFC, 0xFC, 0xFC,
0xFC, 0xFC, 0xFC, 0xFC, 0xFC, 0xFC,
0xFC, 0xFC, 0xFC, 0xFC, 0x00, 0x00, 0x00, 0x00, 0x00, 0x00,
0x00, 0x00, 0x00, 0x00, 0x00, 0x00,
0x00, 0x00, 0x00, 0x00, 0x00, 0x00, 0x00, 0x00, 0x00, 0x00,
0x00, 0x00, 0x00, 0x00, 0x00, 0x00,
0x00, 0x00, 0x00, 0x00, 0x00, 0x00, 0x00, 0x00, 0x00, 0xC0,
0xF0, 0x3E, 0x07, 0x01, 0x01, 0x01,
0x01, 0x01, 0x01, 0xFF, 0x00, 0xFF, 0xFF, 0xFF, 0xFF, 0xFF,
0xFF, 0xFF, 0x03, 0x03, 0x03, 0x03,
0x03, 0x03, 0x00, 0x00, 0x00, 0x00, 0x00, 0x00, 0x00, 0x00,
0x00, 0x03, 0x03, 0x03, 0x03, 0x03,
0x03, 0xFF, 0xFF, 0xFF, 0xFF, 0xFF, 0xFF, 0xFF, 0x00, 0x00,
0x00, 0x00, 0x00, 0x00, 0x00, 0x00,
0x00, 0x00, 0x00, 0x00, 0x00, 0x00, 0x00, 0x00, 0x00, 0x00,
0x00, 0x00, 0x00, 0x00, 0x00, 0x00,
0x00, 0x00, 0x00, 0x00, 0x00, 0x00, 0x00, 0x00, 0xFE, 0xFE,
0xFE, 0xFE, 0xFE, 0xFF, 0xFF, 0xFE,
0xFE, 0xFE, 0xFE, 0xFE, 0xFE, 0xFE, 0xFE, 0xFF, 0x00, 0xFF,
0xFF, 0xFF, 0xFF, 0xFF, 0xFF, 0xFF,
0xF8, 0xF8, 0xF8, 0xF8, 0xF8, 0xF8, 0x00, 0x00, 0x00, 0x00,
0x00, 0x00, 0x00, 0x00, 0x00, 0xF8,
0xF8, 0xF8, 0xF8, 0xF8, 0xF8, 0xFF, 0xFF, 0xFF, 0xFF, 0xFF,
0xFF, 0xFF, 0x00, 0x00, 0x00, 0x00,
0x00, 0x00, 0x00, 0x00, 0x00, 0x00, 0x00, 0x00, 0x00, 0x00,
0x00, 0x00, 0x00, 0x00, 0x00, 0x00,
0x00, 0x00, 0x00, 0x00, 0x00, 0x00, 0x00, 0x00, 0x00, 0x00,
0x00, 0x00, 0xFF, 0xFF, 0xFF, 0x3F,
0xCF, 0xE7, 0xF3, 0xFB, 0xFB, 0xF9, 0xF9, 0xFB, 0xFB, 0xF3,
0xE7, 0xDF, 0x00, 0xFF, 0xFF, 0xFF,
0xFF, 0xFF, 0xFF, 0xFF, 0xFF, 0xFF, 0xFF, 0xFF, 0xFF, 0xFF,
0xFE, 0xFE, 0xFE, 0xFE, 0xFE, 0xFE,
0xFE, 0x3E, 0xDE, 0xE7, 0xF3, 0xFB, 0xFB, 0xF9, 0xF9, 0xFB,
0xFB, 0xF3, 0xE7, 0xCF, 0x3F, 0xFF,
0x00, 0x00, 0x00, 0x00, 0x00, 0x00, 0x00, 0x00, 0x00, 0x00,
0x00, 0x00, 0x00, 0x00, 0x00, 0x00,
0x00, 0x00, 0x00, 0x00, 0x00, 0x00, 0x00, 0x00, 0x00, 0x00,
0x00, 0x00, 0x00, 0x00, 0x00, 0x00,
0x07, 0x07, 0x07, 0x00, 0x0F, 0x1F, 0x3F, 0x7F, 0x7F, 0x7F,
0x7F, 0x7F, 0x7F, 0x3F, 0x1F, 0x0F,
0x00, 0x07, 0x07, 0x07, 0x07, 0x07, 0x07, 0x07, 0x07, 0x07,
0x07, 0x07, 0x07, 0x07, 0x07, 0x07,
0x07, 0x07, 0x07, 0x07, 0x07, 0x00, 0x0F, 0x1F, 0x3F, 0x7F,
0x7F, 0x7F, 0x7F, 0x7F, 0x7F, 0x3F,
0x1F, 0x0F, 0x00, 0x07, 0x00, 0x00, 0x00, 0x00, 0x00, 0x00,
0x00, 0x00, 0x00, 0x00, 0x00, 0x00,
0x00, 0x00, 0x00, 0x00, 0x00, 0x00, 0x00, 0x00,
};

static PCD8544 lcd;

void setup() {
  lcd.begin(84, 48,CHIP_ST7576);
}

void loop() {
  // Draw the ambulance car bitmap...
  lcd.drawBitmap(ambulance, 84, 48);
}
Ma'af Kalau Ada kesalahan dan sesuatu yang kurang pas, atau ada yang salah dalam penulisan blog ini...Mohon Komentar dan sarannya untuk perkembangan BLOG INI, Maaf jika komentar anda tidak saya balas, kemungkinan saya sedang sibuk dengan aktivitas sehari-hari saya..Terima Kasih...:-)
5 comments
Click here for commentslcdnya gk ada backlightnya ya gan?
Replyngk ada gan..
ReplyLCD yang dipakai kok udah bergaris? Bekas ya.... :-!
ReplyGan, saya kemarin ke servisan HP minta LCD-LCD yang udah bergaris dapet seabreg. Lumayan buat Eksperimen, ada yang mau? Jogja, silakan mampir tak kasih gratis. Kalau rangkaian udah jalan tinggal diganti LCD baru.
ReplyPasang LED di belakang LCD bisa ky nya yah
ReplyConversionConversion EmoticonEmoticon